Introduction to OCR
OCR stands for optical character recognition. It refers to any technology that can “recognize” written characters from a given image.
For textual research, we often want to have machine-readable and therefore searchable texts. One way to produce them is by applying OCR to scanned images of a book.
Many OCR tools are available, and some of the free tools might meet your needs:
- Tesseract: This is open source software that can be downloaded from this GitHub
 site and run via a command line. I have found the “out-of-the-box” results with South Asian scripts to be unsatisfactory, but I have not used the newest version (Tesseract 4).
 - Google Drive: You might have observed that when you load a PDF into Google Drive and open it as a Google Document, Google Drive will automatically try to recognize the text in the PDF images. The results are pretty good, but usually not good enough for me.
- Sanskrit CR : This is a web interface that, as far as I know, uses Google Drive OCR. (You will see below, however, that its results are considerably better than what you get from Google Drive itself.) You can drop in an image and it will output the recognized text. Produced by the Sanskrit Research Institute in Auroville.
- Google Cloud Vision: The OCR developed for Google’s Cloud division (separate from Google Drive). You need to use a program (e.g., a Python script) to interact with the Google Cloud Vision API, but it the results are quite good and you can use it for large files.
What follows is the results of each of the foregoing OCR tools applied to this small selection of text (from an edition of the Tāpasavatsarāja of Māyurāja):
Tesseract
325 characters recognized; about 72 are incorrect (~ 78% accuracy)
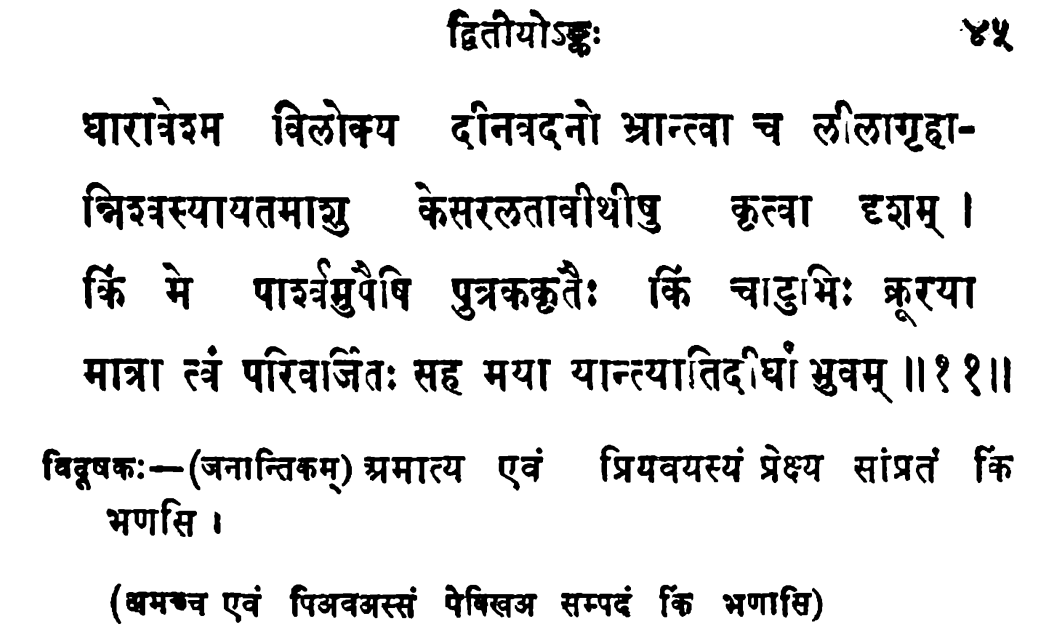
द्वितीयो ४५
धारातरेहम विलोक्य दीनवदनो भ्रान्ता च ललागृहा-
ज्निञस्यायतमाछ्चु केसररतावीथीषु कृत्वा दशम् ।
कि मे पावुपेषि पुतरक्कृतैः किं चाडुभिः ब्रुरया
मात्रा स्वं परिवाजितः सह मया यान्त्यातिद^ष युवम् ॥११॥
विदुषकः -- (जनान्तिकम्) प्रमात्य एवं प्रियवयस्यं प्रेष्य सांप्रतं क्रि
भणसि ।
(क्षमश्च एवं पिअवभस्सं पेक्खिअ सम्पदं छ भणासि)
Google Drive
341 characters recognized; about 19 are incorrect (~ 93% accuracy)
द्वितीयोऽङ्कः
४५
धारावेश्म विलोक्य दीनवदनो भ्रान्त्वा च लीलागृहा- निश्वस्यायतमाशु केसरलतावीथीषु कृत्वा दृशम् । किं मे पार्श्वमुपैषि पुत्रककृतैः किं चाटुभिः क्रूरया मात्रा त्वं परिवर्जितः सह मया यान्त्यातिदीघां भुवम् ॥ ११ ॥
विदूषकः - ( जनान्तिकम्) प्रमात्य एवं प्रियवयस्यं प्रेक्ष्य सांप्रतं कि
भणसि ।
( यमकच एवं पिअवअस्सं पेविखअ सम्पदं कि भणासि )
SanskritCR
341 characters recognized; about 10 are incorrect (~ 97% accuracy)
द्वितीयोऽ
४५
।
धारावेश्म विलोक्य दीनवदनो भ्रान्त्वा च लीलागृहा- निश्वस्यायतमाशु केसरलतावीथीषु कृत्वा दृशम् । किं मे पार्श्वमुपैषि पुत्रककृतैः किं चाटुभिः क्रूरया मात्रा त्वं परिवर्जितः सह मया यान्त्यातिदीघां भ्रुवम् ॥ ११ ॥
विदूषकः - ( जनान्तिकम्) अमात्य एवं प्रियवयस्यं प्रेक्ष्य सांप्रतं कि भणसि ।
( अमच्च एवं पिअवअस्सं पेविखअ सम्पदं किं भणासि )
Google Cloud Vision
333 characters recognized; about 12 are incorrect (~ 96% accuracy)
द्वितीयोऽङ्कः
धारावेश्म विलोक्य दीनवदनो भ्रान्त्वा च लीलागृहा-
निश्वस्यायतमाशु केसरलतावीथीषु कृत्वा दृशम् ।
किं मे पार्श्वमुपैषि पुत्रककृतैः किं चाटुभिः क्रूरया
मात्रा त्वं परिवर्जितः सह मया यान्त्यातिदीघां भुवम् ॥ ११॥
४५
विदूषक: - (जनान्तिकम् ) अमात्य एवं प्रियवयस्यं प्रेक्ष्य सांप्रतं कि
भणसि ।
अमच्च एवं पिअवअस्सं पेबिखअ सम्पदं कि भणासि)
The forerunners are obviously SanskritCR and Google Cloud Vision. For this tutorial, we will be using Google Cloud Vision, because it can handle large texts (in fact arbitrarily large) and because its output preserves the line breaks (and indeed you can have hOCR output if you want). For smaller selections of text you can use SanskritCR.
Prerequisites
You might be asking: if it is so easy to get reasonably accurate machine-readable text from page scans, why isn’t everyone doing it? Well, it isn’t free: Google Cloud charges a very small amount for its OCR service. More importantly, there is a learning curve to Google Cloud Vision (GCV from now on). Before recognizing any text with GCV, you must do the following:
- Prepare the page images;
- Getting ready to use the command line;
- Set up your Google Cloud account and project; and
- Set up the script you’ll use to interact with GCV.
We’ll discuss each of these steps in turn.
Prepare the page images
The script we’ll use with GCV expects the page images in PDF format, so you’ll need to create a PDF if you don’t have one already.
GCV doesn’t really deal well with text in multiple columns. You need to therefore make sure that each printed page is on a separate page of the PDF file.
Often page scans have various problems that can lead to lower quality OCR results. The best results will come from a high-resolution, high-contrast page images, which are not skewed and have little noise. If you are starting from such images already, great. If, like me, you often have page images that are skewed, or contain multiple pages per image, you will want to create a better PDF file. I recommend the program ScanTailor Advanced, which is available in most Linux repositories, and which (I think) can be run on Windows as well. It will split and deskew pages, among other tasks. (It requires the page images in TIFF format, however, so you might need to use some command-line tools such as pdftoppm before running ScanTailor.) Other image-processing tools that I have used are pdftk (for rotating images) and briss (for splitting images). There are some guidelines to producing better PDF images on the Tesseract website .
Getting ready to use the command line
We’re going to be using command-line tools to interact with GCV. This means you should be comfortable with using the command line (also called a shell or terminal). The use of the command line differs for different operating systems. If you use Linux, you probably know all about it. If you use Windows, see this link , and if you use Mac OS, see this link .
Basically, when you open a shell or terminal, you are at a given location in the file system (which you see by typing in pwd and typing enter). You can navigate to other directories by using the command cd (for change directory), followed either by the name of the directory (your terminal should offer you suggestions when you hit the TAB key) or .. for the upper-level directory.
Set up your Google Cloud account and project
In order to use GCV, you must (a) have a Google Cloud account; (b) start a project on the Google Cloud console that will use the GCV OCR.
You can start a Google Cloud account by clicking on the “start” button on the top-right of cloud.google.com . You should select an individual rather than a business account. You will have to enter billing information because the GCV services are not free. As of August 2023, the pricing for OCR requests is $1.50 per 1000 requests (essentially 1000 pages) after the first 1000 pages. In other words, if you OCR fewer than 1000 pages per month, it is free, and you are charged $1.50 per 1000 pages after that.
Once you have set up your Google Cloud account, you’ll create a project, and then you will enable the Google Cloud Vision API for the project. Google has extensive documentation for this, so I will just direct you to the links:
- General overview of Google Cloud Vision
- Create a Google Cloud Project
- Enable Google Workspace APIs (you will only need to enable the Google Cloud Vision API)
You can call the project anything you want. Mine is called indic-ocr.
Since we will be interacting with the GCV API through a script, we are going to need to use the gcloud CLI tools. These are a set of command-line tools to interact with Google Cloud services.
The initialization step is done on the command line with the following command:
gcloud init
If that doesn’t work (which is likely if you are running a Mac) then you might need to use the following command for gcloud:
./google-cloud-sdk/bin/gcloud init
Once you initialize the gcloud CLI, it should automatically select your project.
You will also need to set up a bucket in Google Cloud to use with your project. In the Google Cloud console, under your project, you should see an option that says “Cloud Storage.” Select that and create a bucket for the project if it doesn’t already exist. (See this site for guidance.) A bucket is essentially a folder where data related to the project is stored.
The Python script
At this stage, we have to do two things:
- install Python;
- set up a virtual environment;
- set up the Google Cloud Vision client-side library and other dependencies;
- create a Python script to make the API calls.
Install Python
Python is a programming language that is widely used for textual data. Downloading and installing Python will be different for different operating systems. See the project’s website for more information.
Because different versions of Python have somewhat different features, you need to make sure that the version of Python you have installed will be compatible with the script we’re running. The easiest way to ensure that this happens is to set up a virtual environment which will contain the correct version of Python and all of the required dependencies in the directory where we’re running the script.
Set up a virtual environment
To set up a virtual environment with Python 3.12 (the version I am using), go to the folder where you’re going to be using the script in your terminal, and enter the following command:
python3.12 -m venv ocr-venv
Actually you can replace ocr-venv with anything you like, since this will create a subdirectory in the current directory that contains the Python executables and all of the dependencies.
To start the Python virtual environment, type source ocr-venv/bin/activate. To stop it, just type deactivate.
To check which version of Python you have running in the virtual environment, start the virtual environment and type python --version. You should see something like the following:
Python 3.12.3
Install the GCV client-side library and other dependencies
Now start your virtual environment again. We’re now going to install the dependencies needed for our script to work. Type:
pip install --upgrade google-cloud-vision google-cloud-storage natsort
pip is the program that installs Python libraries. When we run it in the virtual environment, these libraries will only be accessible within the virtual environment. If you try to run the script outside of the virtual environment, Python will complain that it does not have all of the required libraries.
Depending on your Python installation, you might need to use the following command if the above command doesn’t work:
python3 -m pip install google-cloud-vision google-cloud-storage natsort
google-cloud-vision is the client-side library for GCV, and google-cloud-storage is the client-side library for Google Cloud storage, which we will be using.
natsort is a Python library that I use to make it easier to concatenate the files produced by GCV.
Everything else I use should be installed by default, but if Python complains, you can use pip to install the required dependencies.
Create a Python script
Now we can create the Python script we’ll use for our OCR project.
Create a new file with the suffix .py in the directory where you will run the script. The file name can be whatever you want. I called mine text_detect.py. Then paste in the following code (you can also get this file from this gist :
"""OCR with PDF/TIFF as source files on GCS"""
# USAGE: python text_detect.py SOURCE_FILE OUTPUT_FILE
#   Note that both SOURCE_FILE and OUTPUT_FILE must be
#   in the Google Cloud bucket. For example:
#
#   python text_detect.py gs://project-name/file.pdf gs://project-name/read
#
# The API will gather the responses for each page into
#   a JSON file on the Google Cloud bucket, e.g.
#   OUTPUT_FILE-output-1-to-1.json.
#
# This script will then take the recognized text from
#   these JSON files and assemble them into a text document
#   with the name OUTPUT_FILE.txt in the same directory where
#   the script is run.

# Note that you must pass the application credentials
#   so that Google Cloud Vision knows which project
#   to use:
#
#   gcloud auth application-default login
#
# Recommended to run in virtualenv.

# This script is based on what Google suggests at
#   https://cloud.google.com/vision/docs/pdf.

import re
import sys
import io
import os
import json
from google.cloud import vision
from google.cloud import storage
from google.protobuf import json_format
from operator import itemgetter
from natsort import natsorted

gcs_source_uri = sys.argv[1]
gcs_destination_uri = sys.argv[2]
local_output_file = os.path.basename(sys.argv[2])

mime_type = 'application/pdf'

batch_size = 1

client = vision.ImageAnnotatorClient()

feature = vision.Feature(
    type_=vision.Feature.Type.DOCUMENT_TEXT_DETECTION)

gcs_source = vision.GcsSource(uri=gcs_source_uri)
input_config = vision.InputConfig(
    gcs_source=gcs_source, mime_type=mime_type)

gcs_destination = vision.GcsDestination(uri=gcs_destination_uri)
output_config = vision.OutputConfig(
    gcs_destination=gcs_destination, batch_size=batch_size)

async_request = vision.AsyncAnnotateFileRequest(
    features=[feature], input_config=input_config,
    output_config=output_config)

operation = client.async_batch_annotate_files(
    requests=[async_request])

print('Waiting for the operation to finish.')
operation.result(timeout=420)

storage_client = storage.Client()

match = re.match(r'gs://([^/]+)/(.+)', gcs_destination_uri)
bucket_name = match.group(1)
prefix = match.group(2)

bucket = storage_client.get_bucket(bucket_name)

response_list = []

blob_list = list(bucket.list_blobs(prefix=prefix))

for blob in blob_list:
    filename = blob.name
    json_string = blob.download_as_text()
    try:
        response = json.loads(json_string)["responses"][0]["fullTextAnnotation"]["text"]
    except KeyError:
        response = ""
    response_list.append([ filename, response ])

sorted_list = natsorted(response_list, key=itemgetter(0))

for item in sorted_list:
    with io.open(local_output_file + '.txt', 'a', encoding='utf8') as outfile:
        outfile.write("""
=== """ + item[0] + """ ==========================
""")
        outfile.write(item[1])
I won’t explain what this script does in detail, but here are the main steps:
- It uses the input and output parameters to make a request of GCV to perform
DOCUMENT_TEXT_DETECTIONon each page in the input file. GCV gives a JSON output file that is stored in the bucket for the project on Google Cloud. - It downloads the plain OCR text from the
fullTextAnnotationfield of the response for each page and concatenates it into a text file in the local directory.
Using the script
Now that we have set everything up, we should be able to use the script to produce machine-readable texts.
Uploading the file
First, we upload the cleaned-up PDF file that we want to recognize. Go to your Google Cloud Storage bucket (click “Cloud Storage” from your console, console.cloud.google.com/storage ) for this project and click on “Upload,” then select the file. You might want to make sure that it has no spaces. Alternatively, you can use the command-line tool gsutil (see here for more information). For example:
gsutil cp filename.pdf gs://BUCKET-NAME/FILENAME.pdf
Authorizing
Now we need to make sure that the client-side libraries can authenticate to your Google Cloud account. We have installed gcloud, which we’ll now use to create “Application Default Credentials” (ADC) as follows:
gcloud auth application-default login
If that doesn’t work (which again is likely in case of Mac users) you might try the following command:
./google-cloud-sdk/bin/gcloud auth application-default login
Showtime
Now you will start your virtual environment in the directory where you have the script:
source ocr-venv/bin/activate
You will now run the script (I called it text_detect.py) with two parameters: the first is the name of the PDF file in the Google Cloud Storage bucket, and the second is the name of the output file prefix. They should be different.
python text_detect.py gs://BUCKET-NAME/FILENAME.pdf gs://BUCKET-NAME/detected_text
If that doesn’t work you might have to use the command python3 instead of python.
For certain users, especially on Macs, it seems that gcloud does not get the right project ID and you need to tell the script the project ID explicitly. Do the following:
./google-cloud-sdk/bin/gcloud projects list
That will give you the project ID. Copy this, and put it in the following command (replacing “project_id” with your project ID:
export GCLOUD_PROJECT=project_id
If you have the right credentials and dependencies, you should see Waiting for the operation to finish. When it does finish, you will have a file in your local directory called detected_text.txt (or whatever you called the output file when calling the Python script). Check this file and see whether it does indeed contain the recognized text of the PDF file you uploaded.
You can now close your virtual environment:
deactivate
Cleaning up
You might want to delete the files generated by GCV from your Google Cloud bucket. You can do that through the web interface, or you can use the command-line interface gsutil (see here for more information). For example, to delete everything in your bucket, do:
gsutil -m rm gs://BUCKET-NAME/*
Transliteration
Now that you have a text file, you might want to transliterate it. Since you’ve already installed Python, it should be easy to do that now with the sanscript library. On that page there are instructions for installing the library and using the script sanscript to transliterate files. If you install it with pip install indic_transliteration you should be able to do:
sanscript --from devanagari --to iso --input-file INPUT_FILE.txt --output-file OUTPUT_FILE.txt